Maps
This menu item, called "Maps", contains the layer tree of the application as well as other functions for adding data.
Layer tree
The layertree contains all the layers configured for the application in a folder structure. The layer tree organises the layer hierarchy. Layers that are at the top of the layer tree are displayed on the top level of the map.
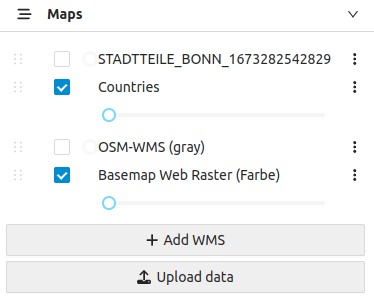
Activation/deactivation: The checkbox in front of the respective element can be used to activate or deactivate layers or folders for the map.
Transparency: It is possible to adjust the transparency of an activated layer in the map using a slider. If the slider is moved to the right, the transparency increases. This makes information that lies under the objects of this layer visible. When the application is started, the transparency is zero for all layers.
Change order: The layers can be moved within the layer tree using drag & drop to change the order of the layers in the map. To do this, a layer can be selected with a mouse click and moved to the desired position by holding down the left mouse button.
These changes are not persistent and therefore only apply to the current session.
Context menu: An additional context menu can be opened for each level using the icon ![]() behind each level. Depending on the configuration of the layer, this menu can contain the following functions:
behind each level. Depending on the configuration of the layer, this menu can contain the following functions:
- the option to zoom the map to the standard scale of the theme ("Zoom to layer extent"); the map section is set so that all objects of the layer are included.
- the option to display the legend; the legend is then displayed below the transparency slider of the layer and can also be deactivated again using the same method in the context menu ("Hide legend")
- the option to download/export the theme, if configured ("Export layer")
- the option to edit the theme, if configured ("Edit layer")
- the option to view the properties of the layer ("Properties")
Add WMS services
It is also possible to add new WMS services to the layertree. The "Add WMS" button below the theme tree is provided for this purpose.
Click on the button to open the corresponding window.
Firstly, a valid WMS URL must be entered or copied into the text field. The basic URL of the WMS is sufficient; it is not necessary to add the SERVICE, VERSION and REQUEST parameters to the URL. They are added automatically. The user can then either click on the "magnifying glass icon" behind the text field or press the Enter key to obtain a list of available levels.
If the service URL is invalid and/or no layers could be read, the user is informed by an error message.
If the WMS URL is valid and the available layers could be read, these are displayed in a selection list below the text field.
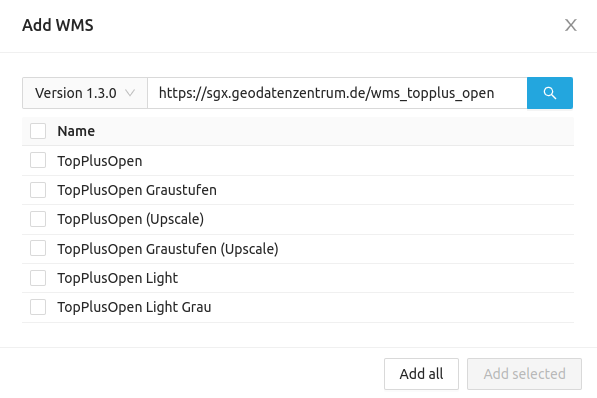
The user now has the option of selecting the desired layers by clicking on the respective checkboxes in order to add them to the map. The desired layers are loaded into the map using the "Add selection" button and are available in the "External services" folder in the theme tree. You can also add all layers of the WMS service without preselection using the "Add all" button. The window closes automatically after the desired layers have been added to the map.
Added external layers are only available within the current session.
Upload data
The "Upload data" button is also located below the topic tree.
Click on the button to open the corresponding window.
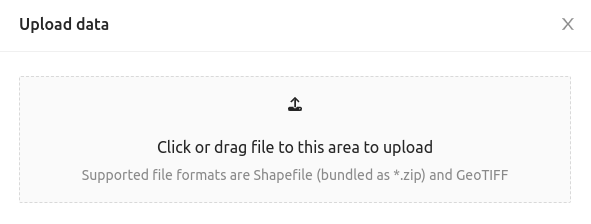
It is possible to add a shapefile as a Zipfile or GeoTIFF. Once the data has been successfully uploaded, it is displayed on the map.
Uploaded data is only available within the current session.